First off, let’s see what a relatively good Raw Data Plot looks like.
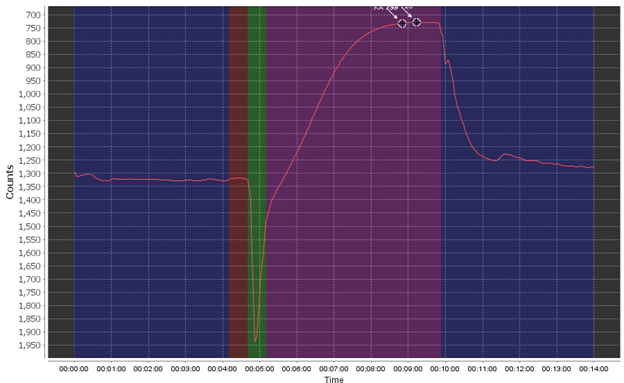
The different phases are the pre-flush phase (dark blue), the ambient baseline reading period (red), the sample reagent pump phase (green), the sample read/reaction phase (purple), and finally the post-flush phase (dark blue). During a “spiked run” the full set of phases are repeated twice.
Using this as an example, you want to see a flat pre- and post-pump phase, a stable (flat) ambient read phase, and a pronounced smooth reaction curve. You may see small bumps here and there due to very small bubbles or other effects but this can be negligible.
The most common failure mode is the bubble spike flag, which triggers when air is introduced into the system, most commonly through the sample line but possibly through incorrectly installed cartridges or tubing.
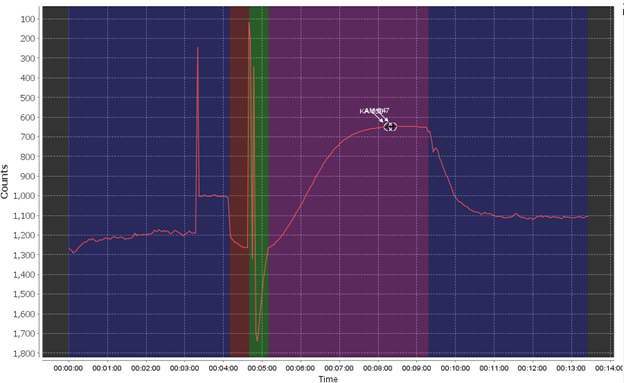
The bubble failure is typically identified by large jumps and spikes randomly in the data, primarily in the pre- and post- pump phase and the ambient read phase. Air bubbles create an unstable base line (red) which will affect the sensor’s accuracy. In extreme examples it can completely overshadow the reaction curve as well or shift the baseline to the point where your reaction creates a negative value. Air bubbles often exacerbate other issues, like weak pumps, clogged filters, or already low phosphate in your sample.
Since bubbles can come from a few different places there are multiple checks you can do to try to stop bubbles from appearing in your data. The most important check is ensuring that your hydrocycle is fully submerged for the entirety of your deployment, as the sample line being exposed to air will introduce bubbles.
You should check that each of your reagent carts are fully installed. Press down on each reagent cart until you can hear them click and be careful about applying too much force to any of the plastic pieces that may crack and allow for leaks or air.
You can also test the pump volumes of each reagent and sample to see if your filters are clogged or if there is another issue causing the sample injection system to fail, like a leak. You do so by using Cyclehost’s Pump controls. You should choose all pumps and run each for 100 pumps. A healthy system will pump 1-1.3 ml of reagent and 2.5-3 ml of sample.
If you have bubbles already and need to recover, the most thorough method is to follow our maintenance and cleaning instructions in the manual, primarily the extended flush. Running the extended flush multiple times should be enough to clear bubbles from your system if no other issues are evident.
If doing so still fails to recover your instrument’s counts please reach out to technical support with a copy of your hydrocycle data and brief timeline of events.